If you have been playing Skyweaver for a while, it is possible that you might have earned some USDC. You can earn USDC by selling your Silver & Gold cards, skins, and stickers, joining and winning in tournaments, or by playing the conquest mode. At some point, you may want to withdraw that money to your bank account or credit card.
Today I will go over one of the most common methods of withdrawing money from Skyweaver, which is using Binance. Please note that to be able to withdraw from Binance or any similar exchange you will need to open an account on their platform and verify your identity. In most cases, you will be asked to verify your address, bank account, and identity. This guide will not go over the account creation process but it is important to know these requirements.
If it is your first time withdrawing I want you to read this guide from the beginning till the end completely. Please don’t go step by step trying to perform the actions while reading. Make yourself familiar with the process first and you may find some points that you may need to check first before performing the actions.
{Disclaimer: Trading crypto is risky and a mistake during a transfer can make you lose your money. Trading platforms including Binance can change their policies, remove or add currencies and their withdrawing methods, or go over maintenance during certain times. This guide doesn’t guarantee all the mentioned methods will work forever. Skyweaverleagues.com or the author of this article does not accept any responsibility in case of a loss. Please perform the actions at your own risk.}
Step 1: Selecting the coin on Binance.
To be able to withdraw our money, first, we have to transfer the money from Skyweaver to Binance. After opening your Binance account click on the Deposit button as shown in the below image. After that click on the Deposit Crypto option.
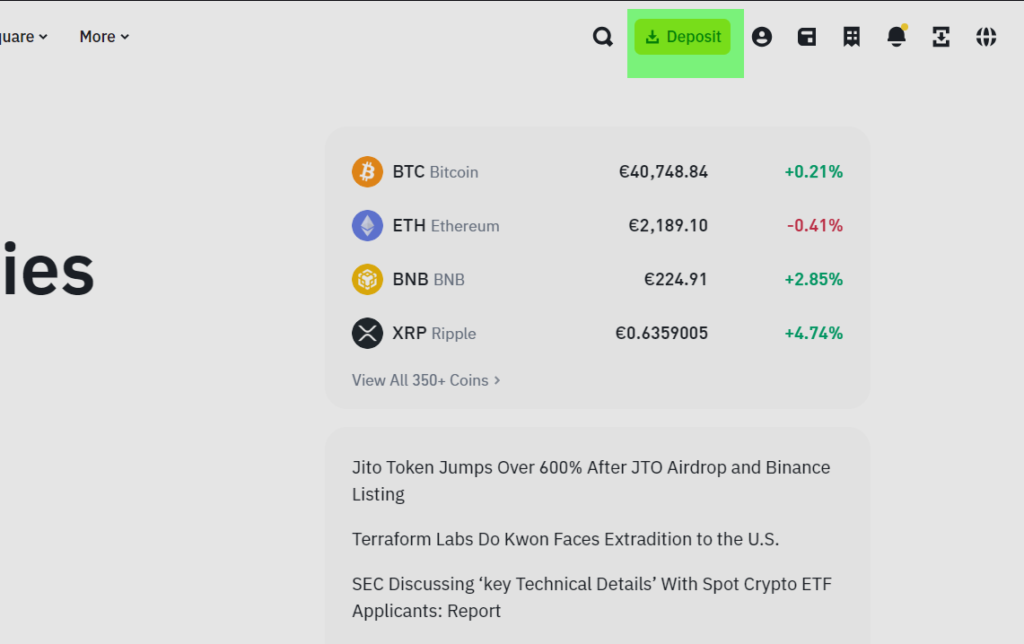
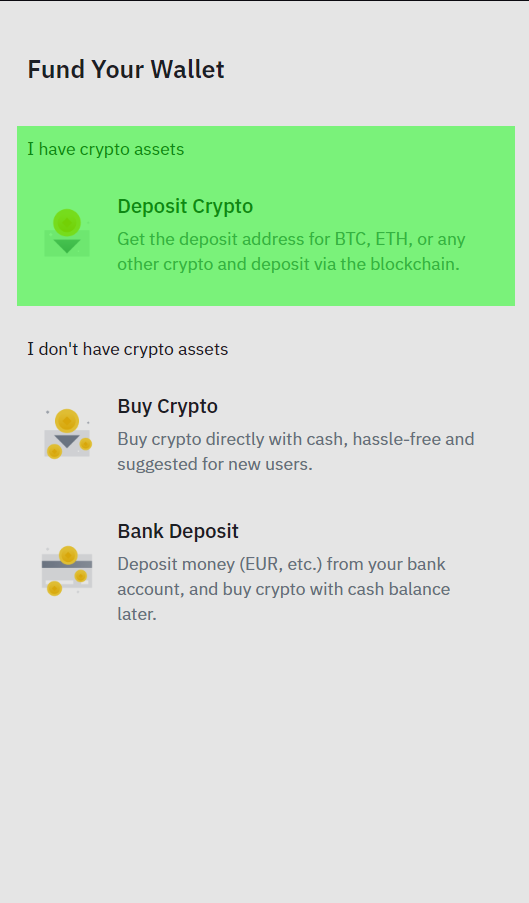
On the deposit crypto page, there are 3 steps that have to be completed. 1st, we have to choose the coin. Currently, Skyweaver uses USDC which is on the Matic(Polygon) network. This is very important. Choosing the wrong currency or the wrong network may result in the loss of your money. On the select coin search box, you can write the name USDC directly to find the coin. When you type USDC it is possible that you may see other similar options, please be careful on choosing the correct option. (NOTE: Previously Skyweaver was using USDC.e instead of USDC and it is referred as MATICUSDCE. Please be careful to not to confuse this coin with the network name, which is similar.)
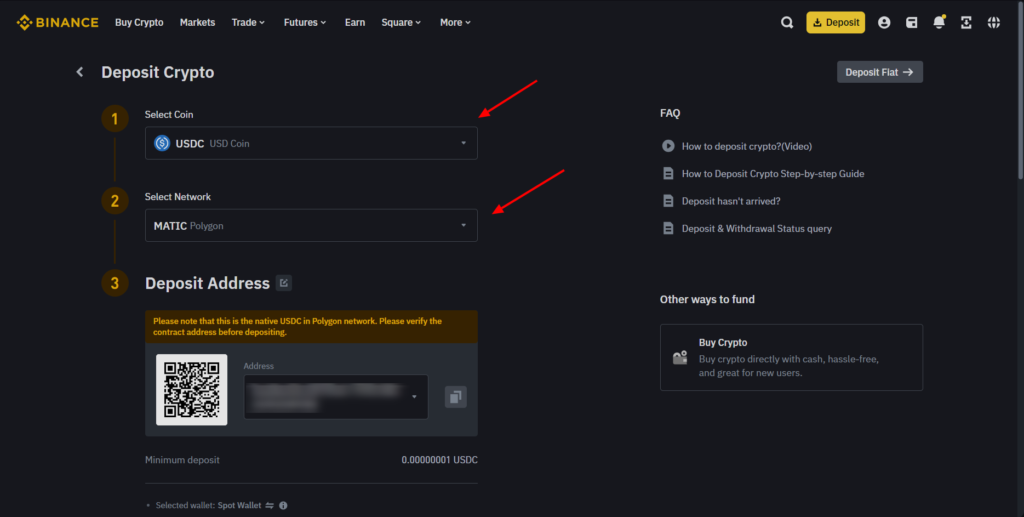
After selecting the USDC, in step 2 you will be asked to select a network. Here you have to choose the Matic(Polygon) option. While choosing the network it will also show you how long usually it will take to transfer the money to your Binance account.
Finally, in step 3, Binance will display a deposit address that you have to copy. Please be careful to copy this address correctly and fully to prevent any issues. There’s a click-to-copy icon that can ease the process. This is the address to which we will transfer our money from Skyweaver.
Step 2: Transferring the money from Skyweaver to Binance
After copying the address head over to the Skyweaver and open your in-game(Sequence) wallet. You can find your wallet on the left corner of the page or under your profile. Click and open your wallet, then select the Send option.
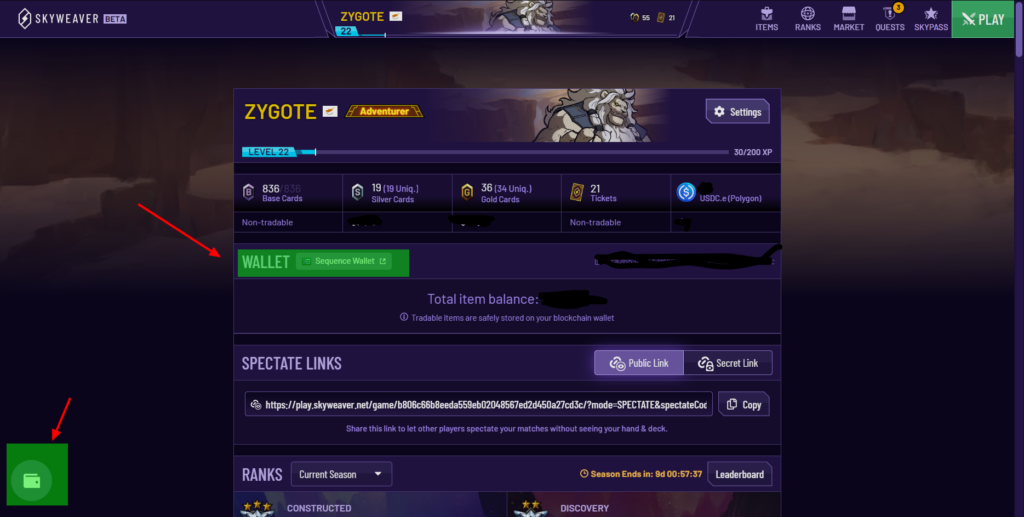
In this step select the coin that you would like to send, in our case USDC. (Please note that this guide is based around USDC. if you are planning to send another coin, on Binance you have to select the coin you want, and its network correctly.) Click on continue and a new page will appear.
Here type the amount of USDC that you want to transfer. Please note that it is important to leave a couple of cents for the transfer fees. So if you are planning to send 100USDC, it is better to type 99.98USDC so you can cover the fees on the next step.
After you type the amount, paste the address that you copied from Binance to the “To” section below. Please recheck the address one more time to be sure that it is correct and click on the continue button.
On the next page, you will be asked to sign the transaction and pay the network fee. Select the coin which you want to pay the network fee, click on confirm and your money will be sent to your Binance account. It may take a while for the money to arrive in your Binance account depending on the amount of confirmations. You can reload the page on Binance and at the bottom, you should be able to see the deposit amount and remaining confirmations. You should receive an email when everything is fine.
Step 3A: Withdrawing To a Credit/Debit Card
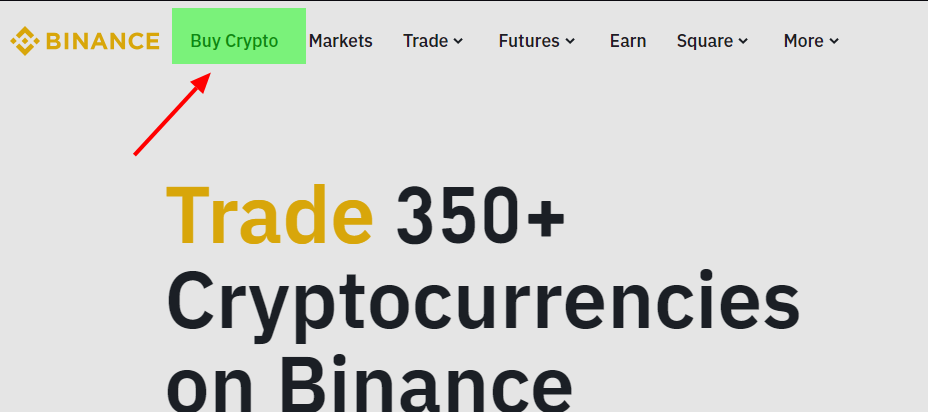
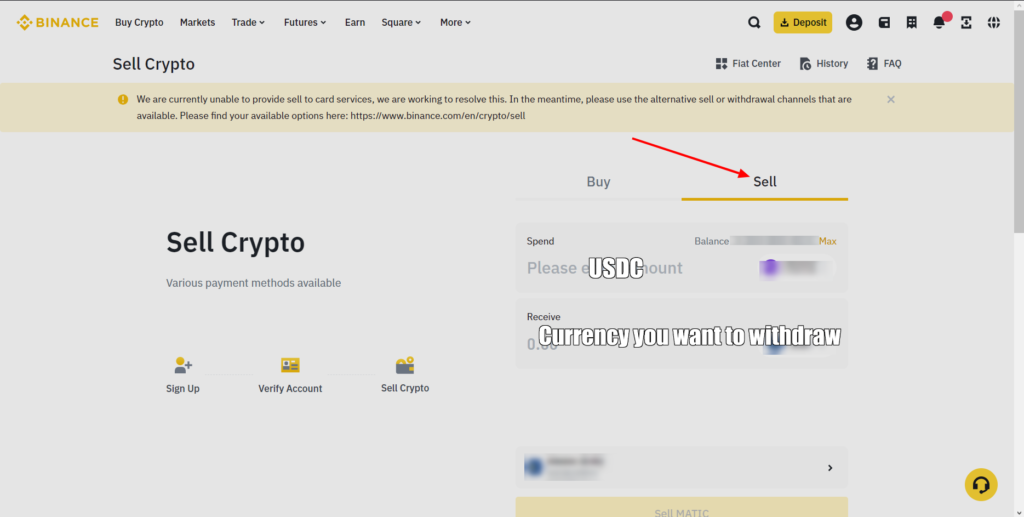
To withdraw to your card, click on the Buy Crypto tab and select the Sell option on the page. Choose the coin that you want to sell as the “spend” option and choose the currency that you want to receive as the “receive” option. Then click on the Sell button. If your card is not verified, Binance may ask you to verify it, and after that, the amount should reach to your card usually very quickly.
Step 3B: Withdrawing To a Bank Account
Withdrawing to a bank account takes 1 additional step which takes around 30 seconds. Withdrawing to a card might be quicker but it is better to know both methods because from time to time one of the methods can get disabled for a while. Depending on where you live withdrawing to a bank account can take up to a couple of minutes to a couple of days. Also, one key difference between withdrawing to a bank account and a card is, that usually withdrawing to a bank account has fewer fees compared to withdrawing to a card.
You can’t directly withdraw USDC to your bank account in most of the cases. You have to convert it to the currency of your bank account. For example, if you have a bank account in Euros you have to select USDC and convert it to Euro. (In some rare cases you may directly use your crypto to withdraw. Before converting you can check the withdraw page that I explain how to access in the next paragraph, on the page you can find the instructions. For instance, currently, there is an option for withdrawing USDT directly to your EURO account)
To convert USDC to your local currency, head over to the trade tab and chose Convert & Block Trade option.

On this page, first, select the coin that you want to convert. In our case USDC. After that select the current you want to receive, such as; EUR, USD, or GBP. When you enter the amounts the preview conversion button should appear. Press and confirm the conversion to receive the currency you prefer to your Binance account.
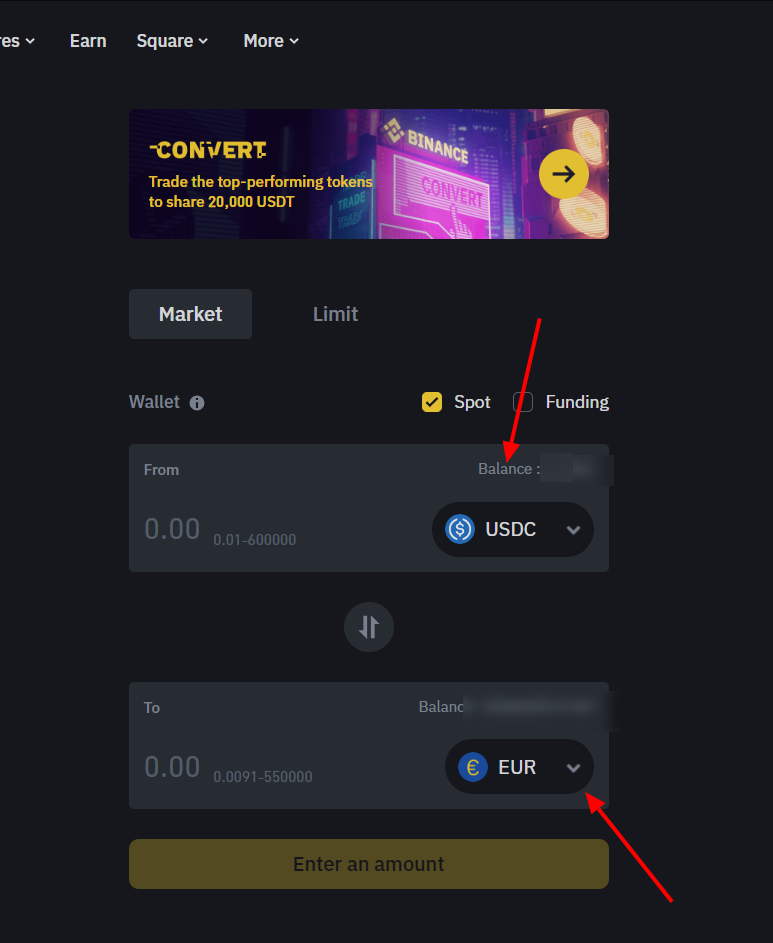
After the conversion go over the wallet button next to your profile icon and click on the Fiat and Spot. On the list below you will see the available currencies and coins that you have. Find the currency that you want to withdraw, click on the 3 dots, and select withdraw

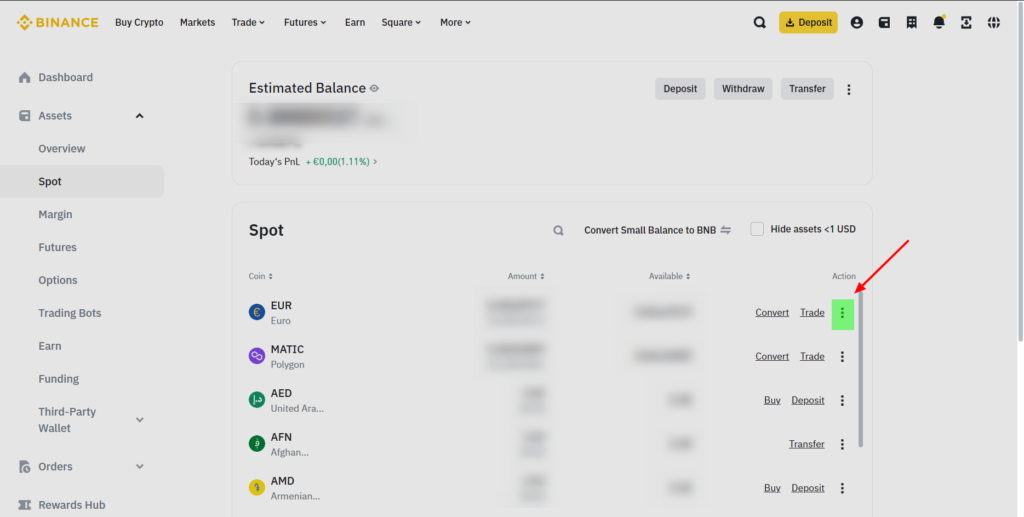
On the next page make sure that you are withdrawing the right currency and select the method you prefer, depending on the currency, there might be multiple, single, or no options. So it is always helpful to check if your currency is available to withdraw.
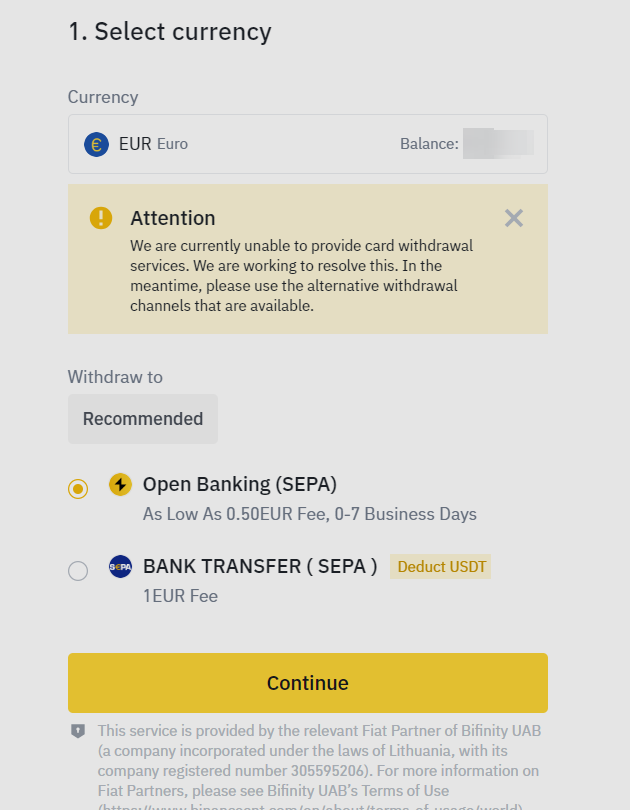
Click on the continue button, and enter the amount that you want to withdraw. If your bank account is already linked, you will just need to complete security verification and the process will be done.
As a final note please make sure that every information that you enter is correct. If you are unsure of what you need to do at any step, don’t take risks. I hope this guide was helpful. See you in another guide 🙂




P2P can be good option as well
Definitely, especially for people who don’t have access to the above two methods.